This article is a case study of our approach to automating a site-wide structured data implementation for our own website, sitebulb.com.
I decided to document the process as it actually came up as a question in our recent Q & A webinar on structured data implementation, so I hope it is useful to some people out there who need to do something similar.
Our site is built using the open source .NET CMS, Umbraco. While there are some off-the-shelf structured data plugins, none of them looked particularly comprehensive, so we decided to work directly with our own developer instead, to build a custom solution.
What on earth is this post about and who is it for?
I anticipate that this post might be useful to anyone in a similar position to us, needing to work directly with developers to (at least mostly) automate the addition of structured data to every page on a website. Hopefully some of the thought processes and methodologies we used might also work for you.
This post assumes a fair amount already;
- You know what structured data is, and understand the value of adding schema markup to your pages.
- You are familiar with the methodology required for adding structured data markup to webpages.
- You are comfortable with schema.org markup and validation techniques.
In some ways, this article can be considered a follow-up to Geoff's post; 'A Practical Introduction to Structured Data for SEO.' If you secretly shook your head when reading any of the statements above, I suggest you go and read Geoff's post first, before continuing any further with this one.
I will run through the exact methodology we used to determine;
- What schema to add to our pages
- How we determined different rules for different webpages
- How we connected schema entities between different webpages
- How we instructed our developers to implement the changes
Although not necessarily documented in full here, we also checked in regularly with our developer to ensure he was happy with our approach - this may be different if you are working with a developer with more/less experience implementing structured data.
Finally, a caveat. Including all the code examples, this post is 5,000 words long - it is deliberately involved. If you have no interest in understanding what is going on under the hood and/or just want a developer to take care of everything, point them in the direction of Yoast's specification, which has all the pieces they would need to figure out the logic, at the very least.
Table of contents
This guide covers everything from our initial experimentation to our site-wide rollout, so there's a lot to get through.
You can jump to a specific area of the guide using the jumplinks below:
- Starting with experimentation
- Mapping out templates
- Examples for page templates
- Homepage - Schema code example
- About page - Schema code example
- Author pages - Schema code example
- Documentation pages - Schema code example
- Guides pages - Schema code example
- Manual implementation
- Developer notes
- Conclusion
Starting with experimentation
Before implementing a site-wide solution, we wanted to experiment first, by manually adding structured data to specific pages, one at a time.
Depending on your level of experience, you may not need to do this step. For us, it acted as a useful training ground where we could practice writing markup and exploring what options could work on our pages, and what the practical implementation actually looked like.
We had already decided to use JSON-LD to markup our structured data, as this allowed us to simply add a 'block' of structured data markup to a page, without worrying about trying to inline Microdata with existing HTML elements on the page. It is also the format recommended by Google, so we didn't think too hard about this decision.
To start off, we simply asked our developer to build a simple custom 'data' field into all the page templates in our CMS, which would allow us to place a JSON-LD script in the <head>;
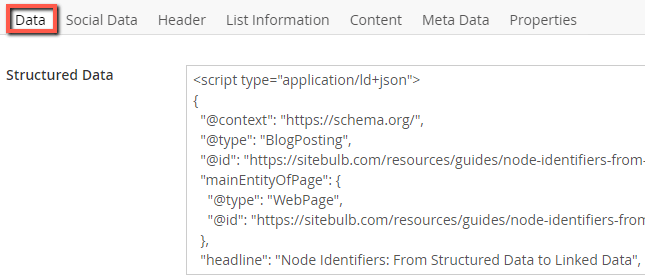
This is pretty much the simplest implementation method we could come up with, as it was an easy job for our developer and gave us the flexibility to experiment (an alternative would be to insert your markup via Google Tag Manager).
In our case, myself and Geoff both experimented with different structured data markup generators, depending on what type of thing we wanted to achieve. This is such a straightforward way to become familiar with how the code is built up, and what sort of data you need for each property.
At this stage, we found it helpful to work with pretty-printed code, so we could better visualise the hierarchical relationships between entities and properties.
One of the benefits of this methodology is that you can visually inspect the page via View Source and manually check your code.

Always be validating
One of the goals of this training phase is an iteration through validation and improvement as you test things out.
Although the markup generators are a brilliant starting point, they are often limited in terms of the properties they allow you to include, and typically only deal with one entity at a time. As soon as you want to add extra, optional, properties, or want to start nesting different entities, you're going to need to get hands on with the code.
If you need some help getting to grips with the markup, I highly recommend this Moz post: An SEO’s Guide to Writing Structured Data (JSON-LD)
Once you get to a point where you have written and edited the JSON-LD, you need to validate it for errors or issues. Fortunately, Sitebulb has a built-in standalone structured data testing tool;
If, for some inconceivable reason, you are not a Sitebulb customer, there are other structured data testing tool alternatives, including Google's useful but limited tool, the Rich Results Test.
In particular, generating code and then validating it gives you a better understanding of which properties are required for Google rich results, and which ones are simply recommended. You can match up the data you have access to, and/or find any shortfalls that you may need to address.
Moving beyond generators
As I mentioned above, beyond the most simple implementations, we found we wanted a bit more than what markup generators could provide. For example, a typical generator would provide something like this for a BlogPosting:
Following my research on the value of node identifiers for structured data, I also wanted to add in @ids for each entity. Manually adding them in transforms the code to:
I might also want to add some additional properties to some of these entities, such as sameAs properties for Person, or a caption to ImageObject.
As soon as you start manually editing code, it is easy to accidentally miss off a comma, or not close a curly } bracket, which will break the JSON script. Again, always be validating. If you do think you've made a JSON error, you can debug in a tool like JSON-LD Playground.
Early proof of concept
One of the benefits of the 'quick and easy' manual method is that it allows you to get some early validation. Whether you need to convince your boss or client in order to secure budget, or you just want to confirm to yourself that you're pursuing a worthwhile course of action, there's nothing like seeing it in action.
For us, seeing some FAQ Schema in the wild was enough for us to commit to it whole-heartedly.

Mapping out templates
These days, websites are built using templates. Whether you use a popular open-source CMS like WordPress (or Umbraco, like this website) or you have a custom built platform, the situation is the same. Several page templates will be created, to cater for different page types, which is dependent upon what content needs to go on each page.
A simple example of an ecommerce store templates:
- Homepage
- Category page
- Subcategory page
- Product page
- Checkout page
- Blog 'homepage'
- Blog category page
- Blog post
- Etc...
Once you have a list of all the page templates, you can then decide which page templates you think could/should include structured data markup, and then for each one, determine what markup you think you could include.
Importantly, this step allows you to rule out certain pages that you think are inappropriate. In the example above, for instance, the checkout page is not one that would make any sense to mark up with structured data.
Our site is no different; we have a number of page templates, and we went through the process of mapping out which schema we would want for each page in turn. This decision was not 'one and done', we figured it out over time based upon:
- Our own practice and experimentation, which had given us a good idea of what we wanted.
- Browsing Google's Search Gallery, to see which Search Features we could realistically attain based on the content we had available/planned.
- Analysing other, similar websites which had already done this.
- Familiarising ourselves with Yoast's excellent documentation of the methodology they use for their WordPress plugin.
It quickly became apparent that there would be some 'core' schema we wanted on every page, some schema that would appear on certain templates but not on others, and some schema that could not be fully automated, and would require some manual implementation on specific single pages.
Our methodology was going to take a 3-step approach:
- Every page would include some core Schema, which would be automatically populated.
- Based on page template, some pages would also include additional blocks of schema, again automatically populated.
- The author can manually add certain additional schema blocks, from a small list of additional types, using built-in generators.
Defining our core Schema
This is the base schema we want to include on every single page, regardless of template. We took our lead here from Yoast, building out a @graph and including a node for each entity. Similarly, we also wanted to include Organization, Website and Webpage for every page.
This from Yoast's specification:

It might be prudent to ask, is there any value in marking up something that is obviously a webpage, as a webpage? John Mueller provided his thoughts on this, earlier in the year;
"So the really common use case is to mark up a page as a web page. Like, we do that on the Google.com home page as well.
So it’s not like us making fun of everyone else, but it’s something where as a search engine you look at that web page and it’s like… it’s a web page and it says it’s a web page, what else could it be? It doesn’t give us any extra value."
As I see it, this is not based on anything to do with Google or trying to obtain rich results, it is more about providing a consistent hierarchy for the content itself. It also provides common entities we will want to cross-reference within other schema blocks, through the use of @id.
For example, we may wish to specify the Sitebulb Organization as the publisher, so it is sensible that this is defined early on.
Linking entities using node identifiers
If you are unfamiliar with the phrase 'node identifiers', or @id that I have mentioned a couple of times above, I strongly urge you to read my recent article, 'Node Identifiers: From Structured Data to Linked Data', which explains why they are so valuable.
For now, suffice it to say that we can use the node identifier attribute in JSON-LD, @id, in order to establish the relationship between different entities across the website.
We determined that our 'About' page is the most appropriate to house our Organization markup, as it is the page that best represents the company (rather than 'Sitebulb the website' or 'Sitebulb the software product'). Utilizing the rubric we defined in the node identifiers article, we can define the @id like this: https://sitebulb.com/about/#organization
It is a straightforward pattern, we simply take the URL, and add the @type in lower case after a hash #.
This is straightforward to also apply to the WebSite, where we can use the homepage and @id like this: https://sitebulb.com/#website
When it comes to the WebPage, we want to use the URL of the page in question. So for an example page, the @id would look like: https://sitebulb.com/example-page/#website
Thus, our core script would be:
We can confirm we are on the right lines by validating again (always be validating...):
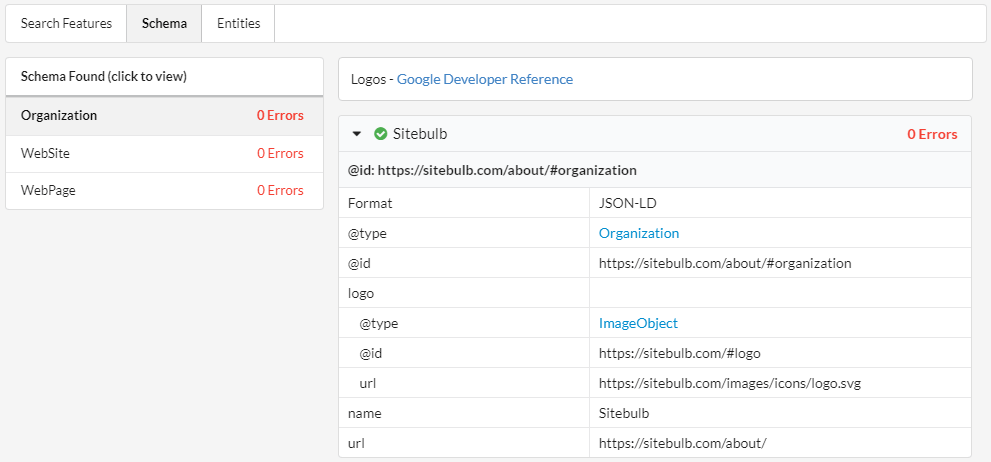
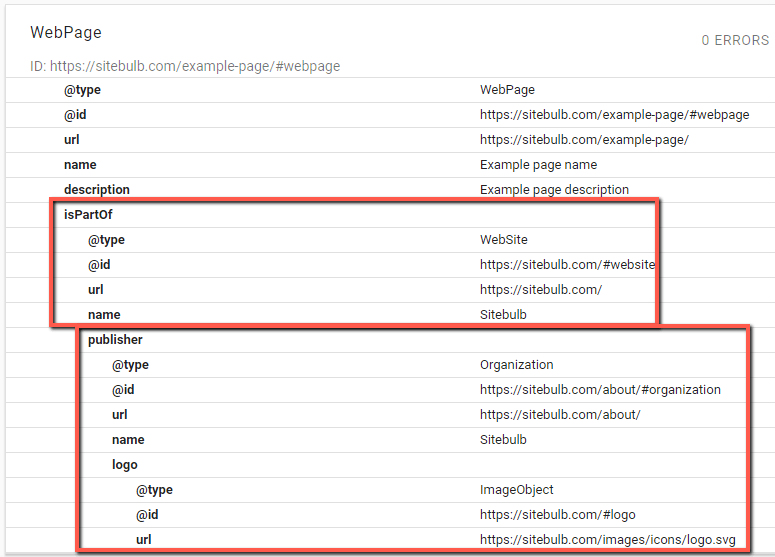
If we check in Google's Structured Data Testing Tool, we can see how they understand the relationship between WebPage and WebSite, via the isPartOf property, and how they understand the relationship between the WebSite and the Organization, via the publisher property.
As such, the output a single entity - the WebPage - which is the most specific entity, and has nested all the associated WebSite and Organization properties even though we only referenced them using the @id. So Google effectively do the nesting for us.
Extending our graph beyond the core script
The core script above is what we will use for every page as a basis, however some pages will also have additional markup. For example, we will markup all of our 'Guides' (pages like this one) using BlogPosting.
In order to do that, we will add our BlogPosting markup underneath the core script. This is one of the benefits of using a @graph object, as we can easily extend our schema by adding new nodes on (you can also achieve the same thing using an array).
Notice the core script stays the same, we just add our BlogPosting markup on the end, enclosed by {curly brackets}. We use the same format for building the @id for BlogPosting, it is simply the same URL with #blogposting on the end.
When dealing with BlogPosting, we will also want to include the recommended property mainEntityOfPage, as the article itself will always be the primary topic of the page (even if it also describes other entities, like in this case).
We can do it like this:
BlogPosting -> mainEntityOfPage -> WebPage
And since we have already defined the WebPage in our core script, we just cross-reference using @id. We can also do the same thing with publisher, using the Organization node identifier.
Finally, we also need to include the author as a required property. Our author pages live on URLs like this: https://sitebulb.com/resources/authors/patrick-hathaway/, so by adding the #person fragment we build the @id for that. In this instance, we want to reference the author page itself as this is the page on our site which best describes the person 'Patrick Hathaway.' On the author page we will include more comprehensive Person markup, as you will see in the examples below.
This shows how we defined our core schema, how we can extend it for certain page types, and how we can cross-reference entities on the same page AND on other pages using node identifiers.
Examples for page templates
Following discussions of the above with our developer, the core thing he wanted for each of our page templates was a worked up example. So, for each page template, we clarified exactly what schema we wanted in addition to the core script, and what the additional code looks like on an example page.
With all the examples that follow, the properties we used were determined by a number of factors: analysing any properties deigned 'required' or 'recommended' by Google, all the available properties we could use based on Schema.org, and possibly most importantly: the data we actually have available.
Homepage - Schema code example
Lots of websites add Organization schema to their homepage, we were in fact wondering if we should do the same. However, we also wanted to mark up a page as SoftwareApplication, given to the fact that Sitebulb is a... Software Application.
Our choices were either the homepage, the pricing page, or the download page. However when we analysed the content on each of those pages, only on the homepage was the software itself most clearly the central topic. And in fact, it is nothing at all to do with the Sitebulb organization, which is a much better fit on the 'About' page, where we actually talk about the team, the company, the mission etc...
So our Homepage schema was simply a very basic implementation of SoftwareApplication;
Notice now a corollary. Earlier we decided/insisted upon defining both the Organization and the Website in our core schema. Now, we have also defined the software application itself. Each has the common name of 'Sitebulb', yet has a unique @id.
This would allow another website to reference, via structured data, any one of 3 things called 'Sitebulb', and unambiguously identify whether they mean the magnificent, award-winning software, the beautifully insightful website, or the superstar company behind both.
Guidelines and resources for SoftwareApplication Schema:
About page - Schema code example
Per the above, we decided to make our About page the one which contained our Organization schema. There is varying advice about how Organization should be handled. Google say 'only put it on one page', whilst offering no reason why it can't go on all pages. Yoast's implementation is to include a full Organization schema on every single page, since Google are currently not following @id and tying the relationships together across pages.
Our solution is a bit of both. We use the About page as our main Organization page, and include all the properties we want on there. Then we will simply reference Organization on our other pages, cross-referencing using the @id: https://sitebulb.com/about/#organization.
UPDATE: Following a suggestion from Jono Alderson, we also now dynamically change the WebPage from the core script to be AboutPage instead. The only way we could do this was by building a 'Page Type' over-write into the page template, displayed below. As a side benefit, this now also allows us to adjust the @type for other pages as well, should we wish to do so in the future.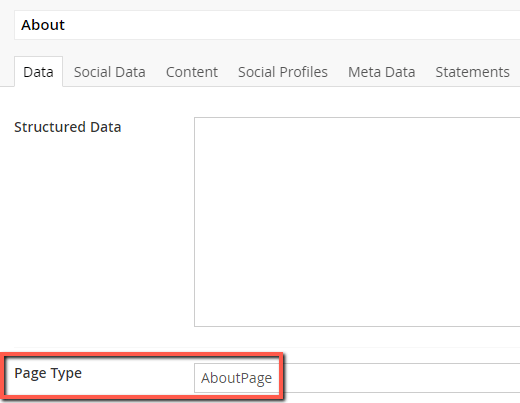
Guidelines and resources for Organization Schema:
- How to Write Great Schema Markup for Your Company
- Steal Our JSON-LD: Organization Example
- Schema.org: Organization
- Google Documentation: Local Business
Author pages - Schema code example
Author pages are an interesting one, since we have recently started working with guest authors, and we have been creating an author page for them on our site. This is where an important and interesting Person property comes in: sameAs.
Look what you can do with it:
"sameAs": "https://twitter.com/HathawayP"
By using the sameAs property, we can clarify that the same person who writes these articles for Sitebulb is also '@HathawayP' on Twitter. In fact, we can provide an array of social profiles:
Now, imagine we set this up for our guest authors, and they, in turn, set it up on their own websites and on other places they write. By doing this, they would be building out a little network of connected nodes that all externally validate one another. Without delving too much into E-A-T, this is theoretically an avenue to 'connect the dots' so that Google can understand topical authority and expertise.
We'd also like to establish the relationship between the author and the Organization they work for, via worksFor.
Thus our author schema becomes:
UPDATE: Another suggestion from Jono was to actually include the sameAs and url properties for 'authors' whenever we reference a Person (which is basically just on blog posts). His reasoning was, verbatim, "How/where Google use IDs as URLs (and vice-versa) is inconsistent. /sigh".
This suggestion makes a lot of sense, particularly because these sort of references to 3rd party profiles help Google piece together their knowledge graph. So web now also include these additional Person properties on our BlogPosting pages.
Guidelines and resources for Person Schema:
Hints & Documentation pages - Schema code example
The Hints/Documentation pages on our website don't offer much in terms of structured data opportunities. They do utilize breadcrumbs, and the logic for building them is already built into the system, so we are able to add the BreadCrumbList markup, like so:
Guidelines and resources for BreadCrumbList Schema:
Guides pages - Schema code example
Our Guides pages are pages like this one, which are effectively blog posts - as such we want to use the BlogPosting markup. I actually covered this schema already in the section above, 'Extending our graph beyond the core script'. However, for completeness, and to show you what it looks like without the 'core script' at the start, here it is again:
Guidelines and resources for BlogPosting/Article Schema:
Manual implementation
All of the examples above are designed to populate automatically, with different markup 'blocks' being included on different page templates. However we also wanted to optionally include FAQ schema on some pages, which is not easy to automate. You can't really automate it because you really need the author of the article to sit there and determine 'here is question 1', 'here is answer 1', and so on.
So our other request was to effectively have a 'generator' built into the CMS, that could optionally add in an extra blocks of FAQ schema into the graph, that we would manually fill in before publishing an article.
To start off with, we were only interested in adding the FAQPage markup using this 'generator' method, however in the future we might also be interested to explore VideoObject, HowTo and Event, among others.
FAQ Page generator
We didn't need to reinvent the wheel with this one. There are plenty of FAQ Page generators out there, so we just asked our developer to build one like this example from Merkle:

This is super straightforward, and just requires us to enter the text for each Question/Answer pair, and the CMS would build the markup. We didn't build any validation into it, instead we put the responsibility on ourselves to fill in the fields correctly.
However, I added a complication, for our developer to figure out(!). On all our 'Guides' pages (like this one), whenever we added a FAQPage markup, I wanted it to be appended to the BlogPosting markup, and nested via the hasPart property.
Here is the Schema.org definition of hasPart:

Essentially, what this allows us to say is, 'we have this BlogPosting, and as a part of that, we also have this FAQPage.'
You don't need to include this property, you can instead just add it on as another node on the graph, however there is a subtle difference from doing this.
If we don't nest FAQPage under BlogPosting using hasPart, Google understand the page as 2 distinct entities:

However, when we do use hasPart, Google sees it as 1 entity:

The BlogPosting is the main entity on the page, and everything else is nested under it, with the relationships between each block understood.
Incidentally, if you are only using Google's Rich Results Test (not recommended!) for validation, you won't notice a difference from this sort of nesting. It will simply tell you eligibility for the Search Features found, whichever way round you do it:

Here is the FAQPage schema in a complete example with the core script, the additional templated BlogPosting, and also the FAQPage markup worked in:
Guidelines and resources for FAQPage Schema:
- How To Write FAQ Page Schema Markup To Increase Organic Clicks
- Schema.org: FAQPage
- Google Documentation: FAQ
Developer notes
I actually ended up sharing this specific document with our developer, so he understood our methodology and could see the code examples and documentation links. One of the things he pointed out was that on some pages, we don't currently store/display some of the data I wanted to mark up.
For example, on our author pages I wanted to optionally show multiple values for the sameAs attribute;
But originally, we had only displayed the Twitter link on our author pages:

Similarly, in our CMS there was only the opportunity to store the Twitter link:

So we knew we'd need to make adjustments to the templates in order to include the data we wanted. And then of course it was up to us to correctly populate those data fields.
He did decide to deviate from my methodology for the breadcrumb markup, due to the way we were already generating breadcrumbs on the page. We already had a script that loops to find the parent and child pages, and he did not want to duplicate this logic. So we ended up with our normal JSON-LD script in the <head>, and then a separate one specifically for breadcrumbs in the <body>.
The other thing we discussed was adding in conditional logic for instances where certain data did not exist. The author pages again are a prime example - we might have a guest author who ONLY wants to provide a link to their LinkedIn page. In that case, in our CMS only one 'social link' would be populated, and in our structured data markup we'd need to return only a single value for the attribute (rather than rendering an array).
There weren't many instances of these, so it didn't add to the job too much. But it certainly was worthwhile to think about each page template: 'will we ALWAYS have access to all the data on the page?'
To contextualise this question a little, I have seen examples of ecommerce sites whose Product markup breaks down on certain types of products, for example 'Price on Application', which ends up making the schema markup invalid.
Determining how you want to handle such situations from the outset will save you grief in the long run!
Always be validating (part II)
As we iterated through the development process for the page templates, we would continually validate one page at a time, using Google's SDTT or a similar alternative. However, once the code was set live on the site, we needed to move to sitewide validation.
This is where Sitebulb came in, which allowed us to extract and validate structured data as part of a crawl. I won't cover the details of how to set this up, as we already have extensive structured data documentation for your perusal.
Suffice it to say, we had an immediate jump in the number of pages with eligible markup:
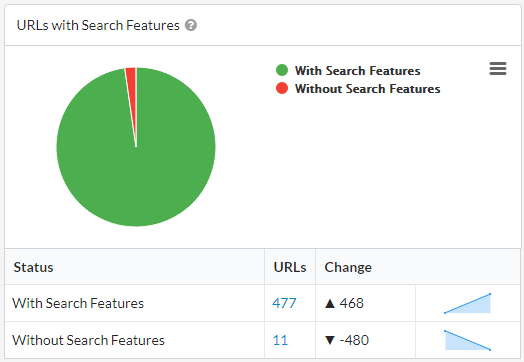
Since we'd pushed the code changes live on the website as we were tidying things up, Google Search Console also chimed in with a few parsing errors:
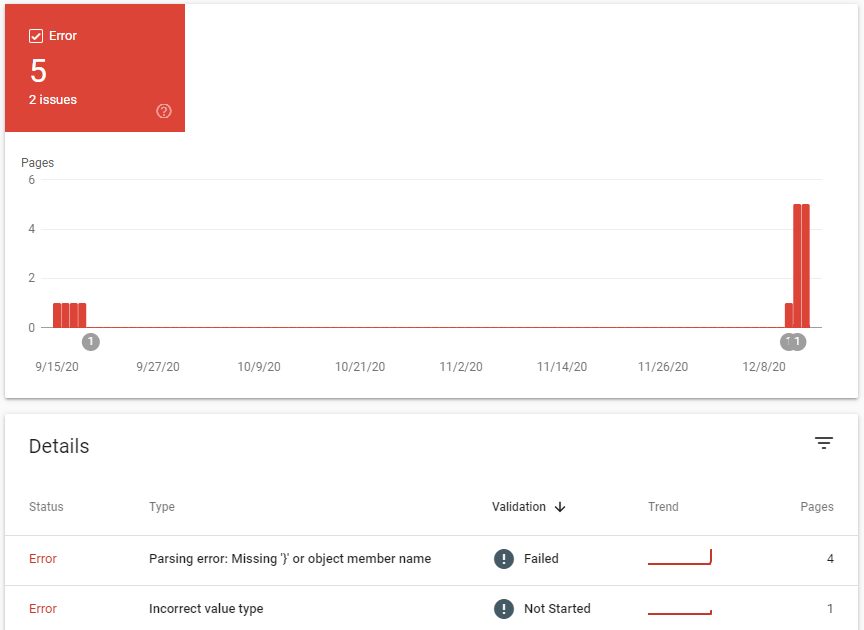
These came from a few marginal page templates we had forgotten about, and a couple of instances where we needed to update some data fields in the CMS, as the schema code was 'expecting' data (e.g. we did not have 'publish date' on a few older posts).
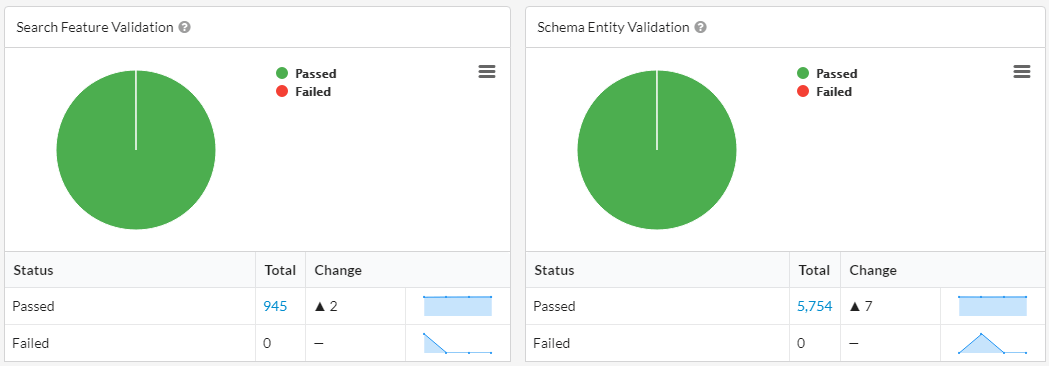
We continually tested and fixed these edge cases. Once we'd worked through all the kinks with our developer, we reached a point where all the data was right and all the markup was valid:
A documented framework for your developer
This post was originally inspired by a question on our structured data Q & A webinar:
"What info should I provide the dev team on when/where/how to use structured data?"
Here is the question (+ a bit more context from Geoff) and the answers from our guests Lily and Jono:
This 5000 word essay is my answer to her question. However, I've done a lot of work explaining our methodology and how certain elements fit together, to make it clearer for the reader.
To our developer, that stuff didn't matter so much. Once we'd gone through the fundamental aspects - the core schema and the node identifiers linking everything together - the most important thing for him was code examples for each of the different page templates. From there he was just following the logic and building out the scripts, something he is familiar and comfortable with already.
So if you do find yourselves in a situation like us, wanting to roll out a comprehensive implementation without an 'off the shelf' solution, I hope you find this useful.


